Using Flows for Onboarding
Build first-run app onboarding with Flows, branching, user attributes, permission prompts, paywalls, and Flow Journey analytics.
Flows are the primary way to build onboarding in Superwall. Use them when you want to introduce the app, collect user preferences, branch users into different paths, request permissions at the right moment, present a paywall, and keep iterating without shipping app updates.
This guide focuses on in-app onboarding after the user has installed or opened your app. If the journey starts on the web before app install, use Web Flows instead.
If you are new to Flows, start with Getting Started with Flows, then come back here for onboarding-specific structure and launch guidance.
How onboarding Flows work
An onboarding Flow is a paywall with a Navigation element and route-based pages. Campaigns and placements decide when the onboarding Flow appears. The Flow editor controls what happens after that: screens, buttons, routes, branches, permission prompts, products, and post-purchase steps.
Some common patterns found in onboarding Flows might include:
- A welcome or value proposition page.
- One or more preference questions using Flow Elements.
- A personalized education or recommendation page.
- A permission prompt, if the permission is part of the product experience.
- A paywall or offer page.
- A final confirmation, setup, or "start using the app" page.
You do not need every step in every app. Keep the Flow focused on the user decision or setup step that matters most.
Choose an entry point
Most onboarding Flows start from either the app_install placement or a custom placement.
Use app_install for first launch
The app_install standard placement fires when the SDK is configured for the first time. Use it when the onboarding Flow should appear as part of the first-launch experience.
To set it up:
- Create a campaign for onboarding.
- Add
app_installas a placement. - Assign your onboarding Flow paywall to that placement.
- If the Flow must be ready immediately, use Priority Placements so Superwall preloads it before the rest of your campaigns.
Because app_install fires once per install, it works well for simple first-run onboarding. If your app has account creation, migration screens, or other native setup before onboarding should begin, use a custom placement instead.
Use a custom placement for native control
Use a custom placement when your app decides exactly when onboarding should begin. For example, you might present onboarding after account creation, after a welcome screen, or after restoring an existing session.
Superwall.shared.register(placement: "onboarding_start")Superwall.instance.register(placement = "onboarding_start")await Superwall.shared.registerPlacement("onboarding_start");await Superwall.shared.register({ placement: "onboarding_start" });Create the same placement in your onboarding campaign and assign the Flow paywall to it.
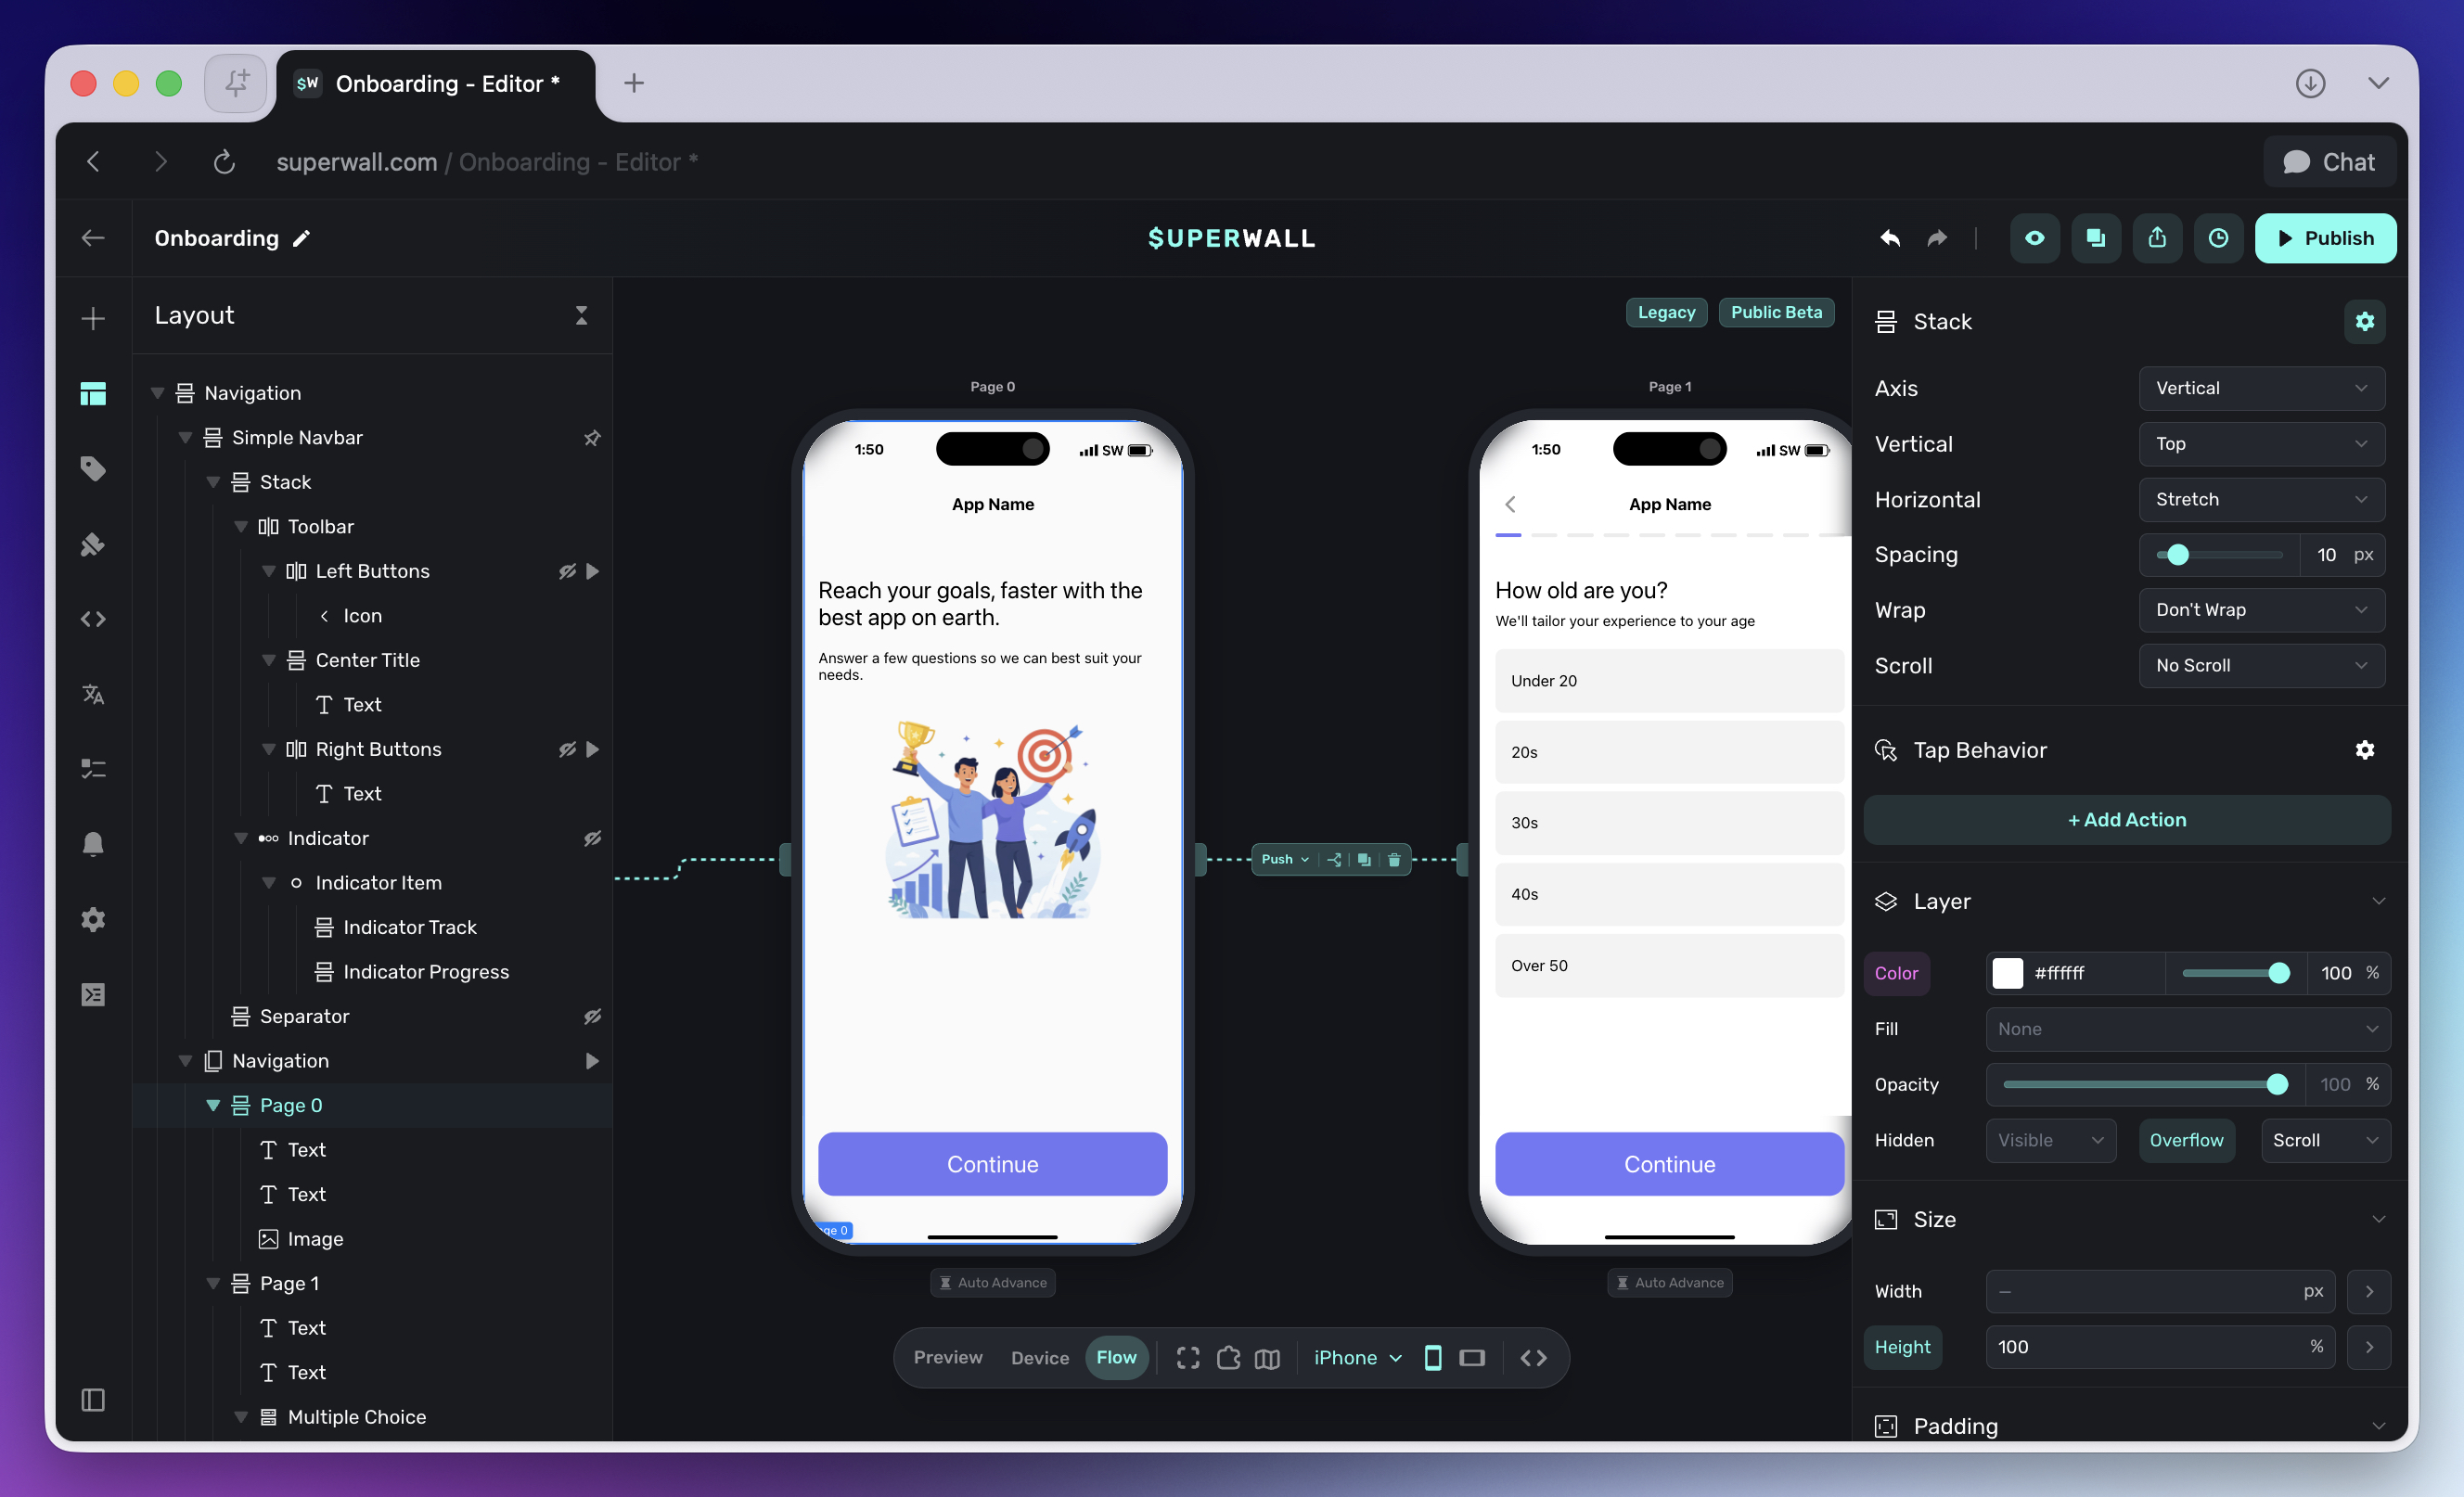
Build the Flow
Create the onboarding experience in the paywall editor:
- Add a Navigation element.
- Add pages for each onboarding step.
- Switch to Canvas view.
- Connect the entry point to the first page.
- Connect the rest of the pages with routes.
- Add buttons with the Navigate Page tap behavior so users can move forward or backward.
Start with a linear Flow first. Once the basic path works, add branching, permission prompts, purchase steps, and post-purchase pages.
Personalize the path
Onboarding is usually more effective when the user sees a path that reflects what they told you. Use Multiple Choice, Input, and Date Picker elements to collect onboarding data.
Common examples:
- Ask about the user's goal, then branch to different education screens.
- Ask about experience level, then change the amount of setup guidance.
- Collect a name, then use it in later copy.
- Ask for a target date, reminder time, or preference, then save it as an attribute.
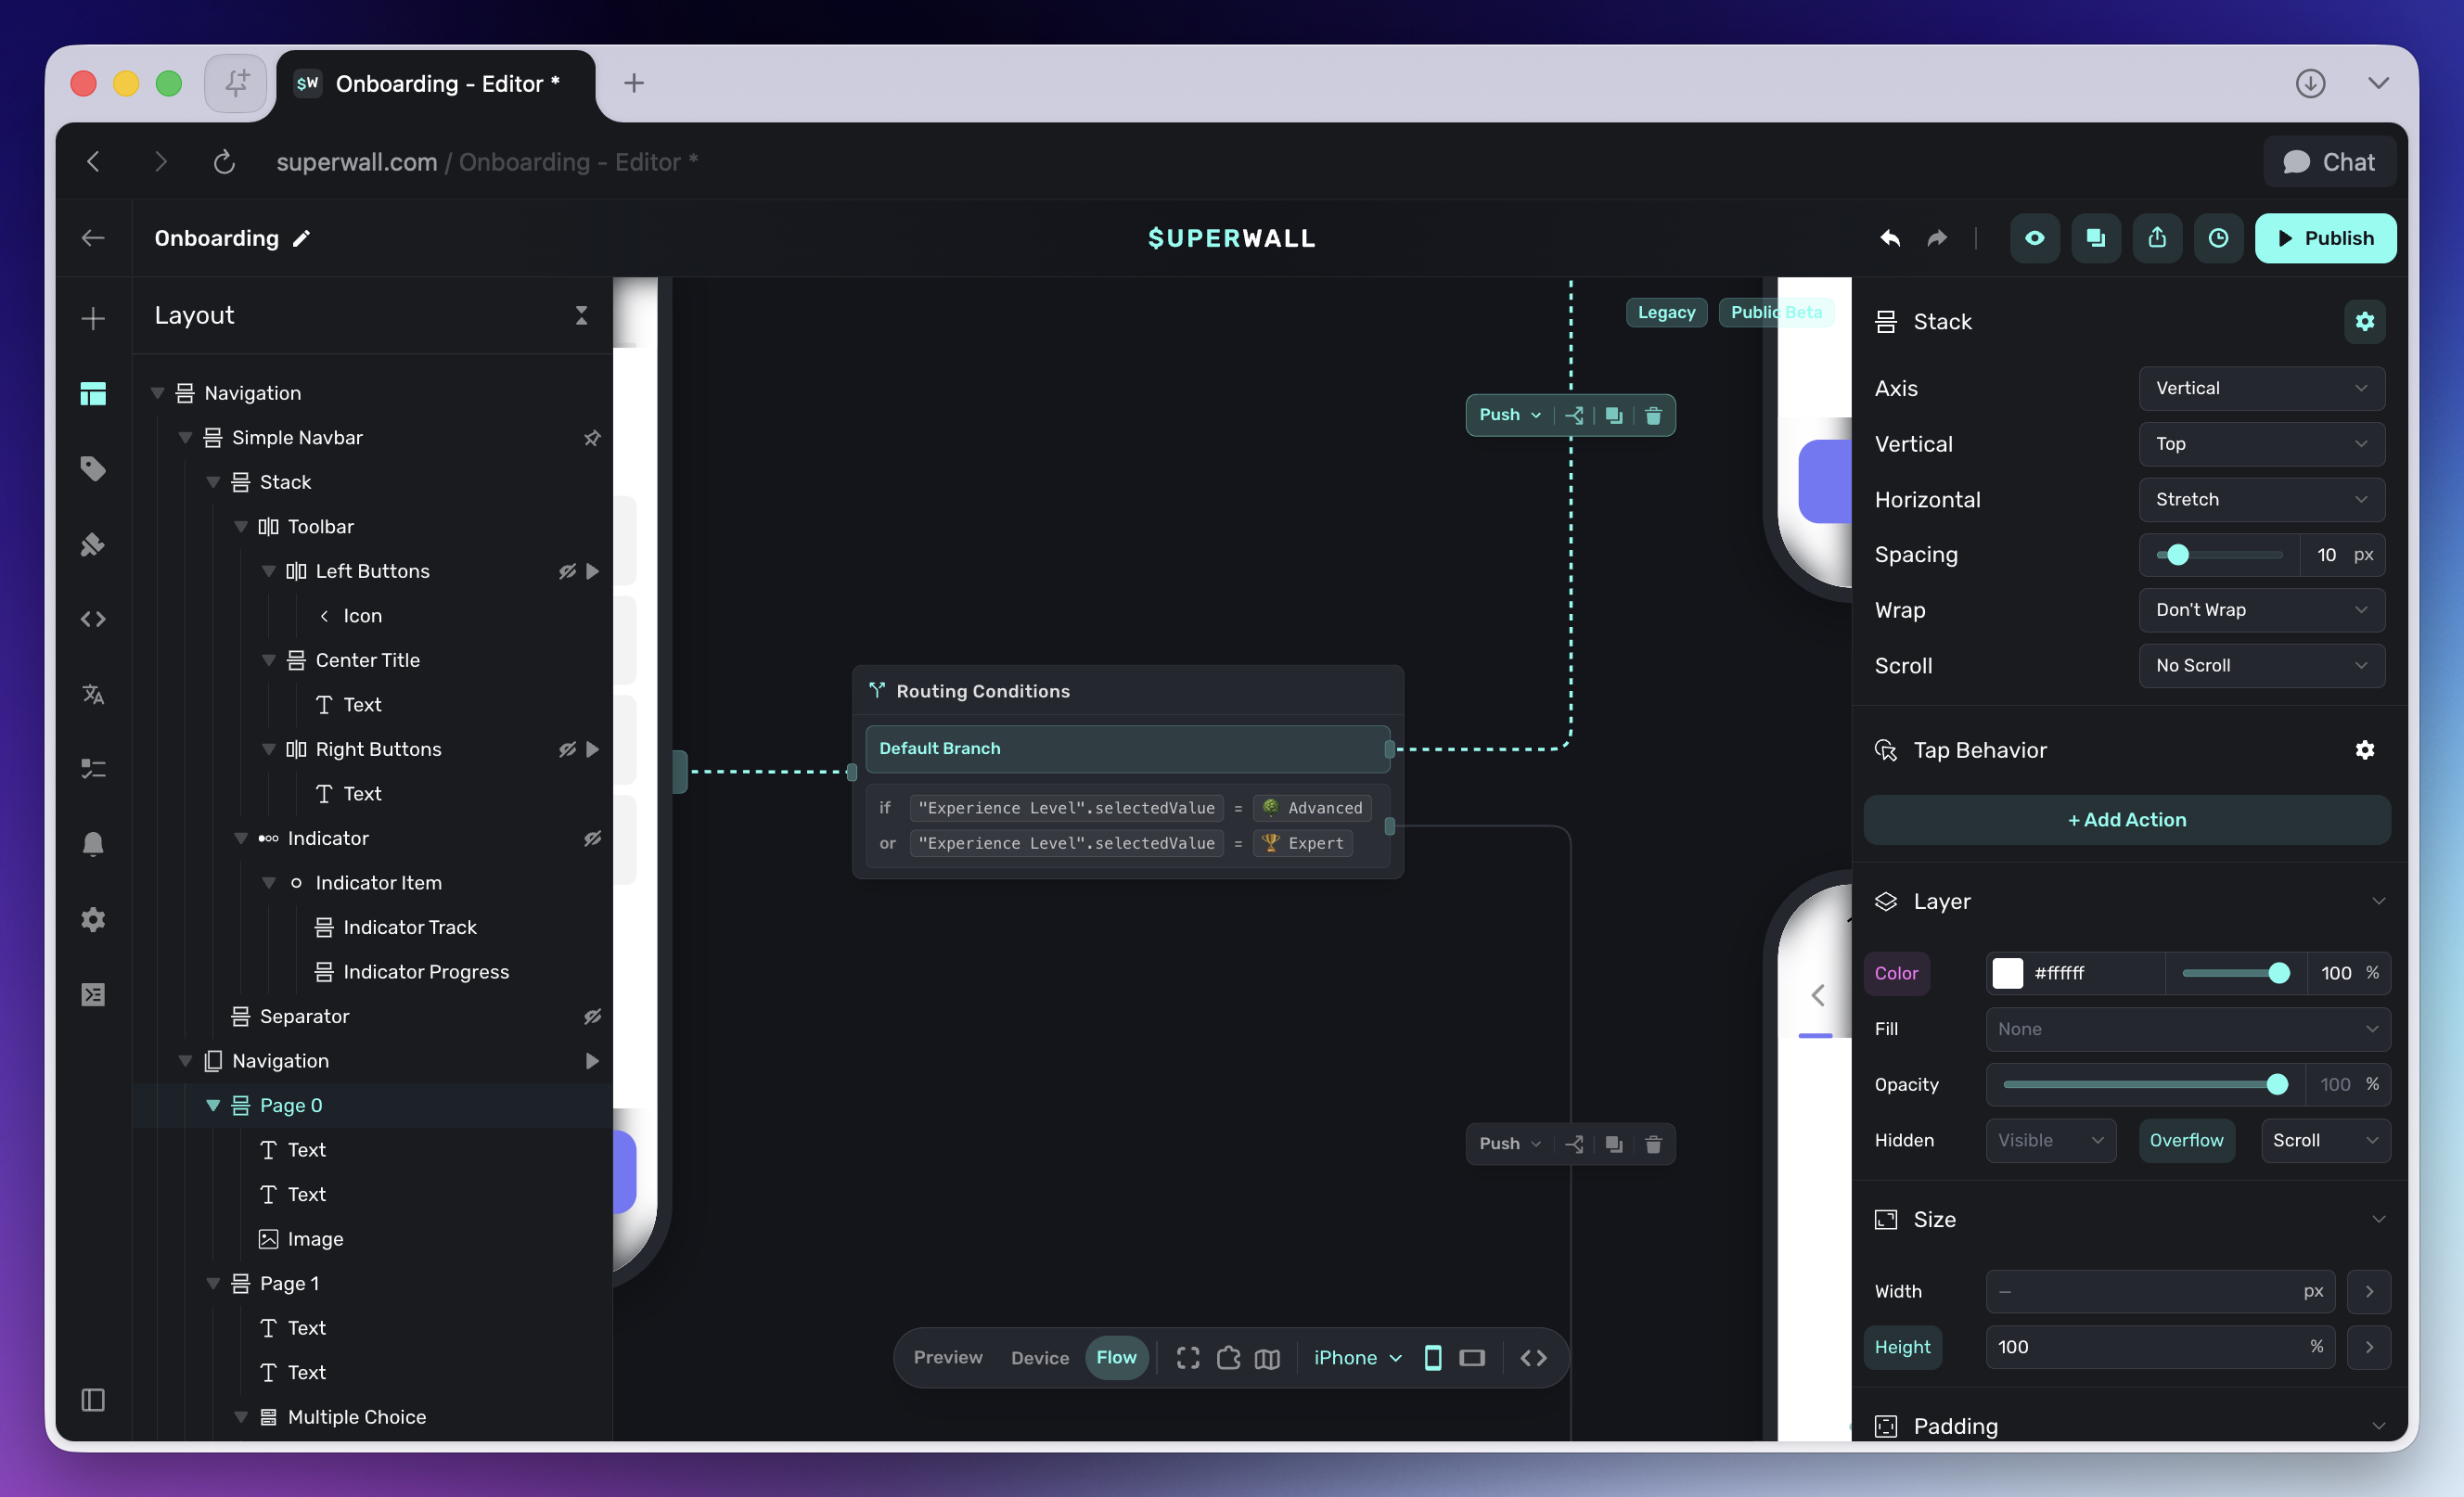
Branching is configured on routes in the Canvas, not inside each CTA. For example, a single Continue button can move forward while route conditions decide whether the next page is a beginner path, advanced path, permission explainer, or paywall.
For setup details, see Linking Pages and Flow Elements.
Set user attributes
Use onboarding answers to set user attributes. Those attributes can personalize the rest of the Flow, target future campaigns, or feed your analytics and lifecycle tools.
Good onboarding attributes are stable and useful later:
onboarding_goalexperience_levelpreferred_reminder_timehas_completed_onboardingpermission_intro_seen
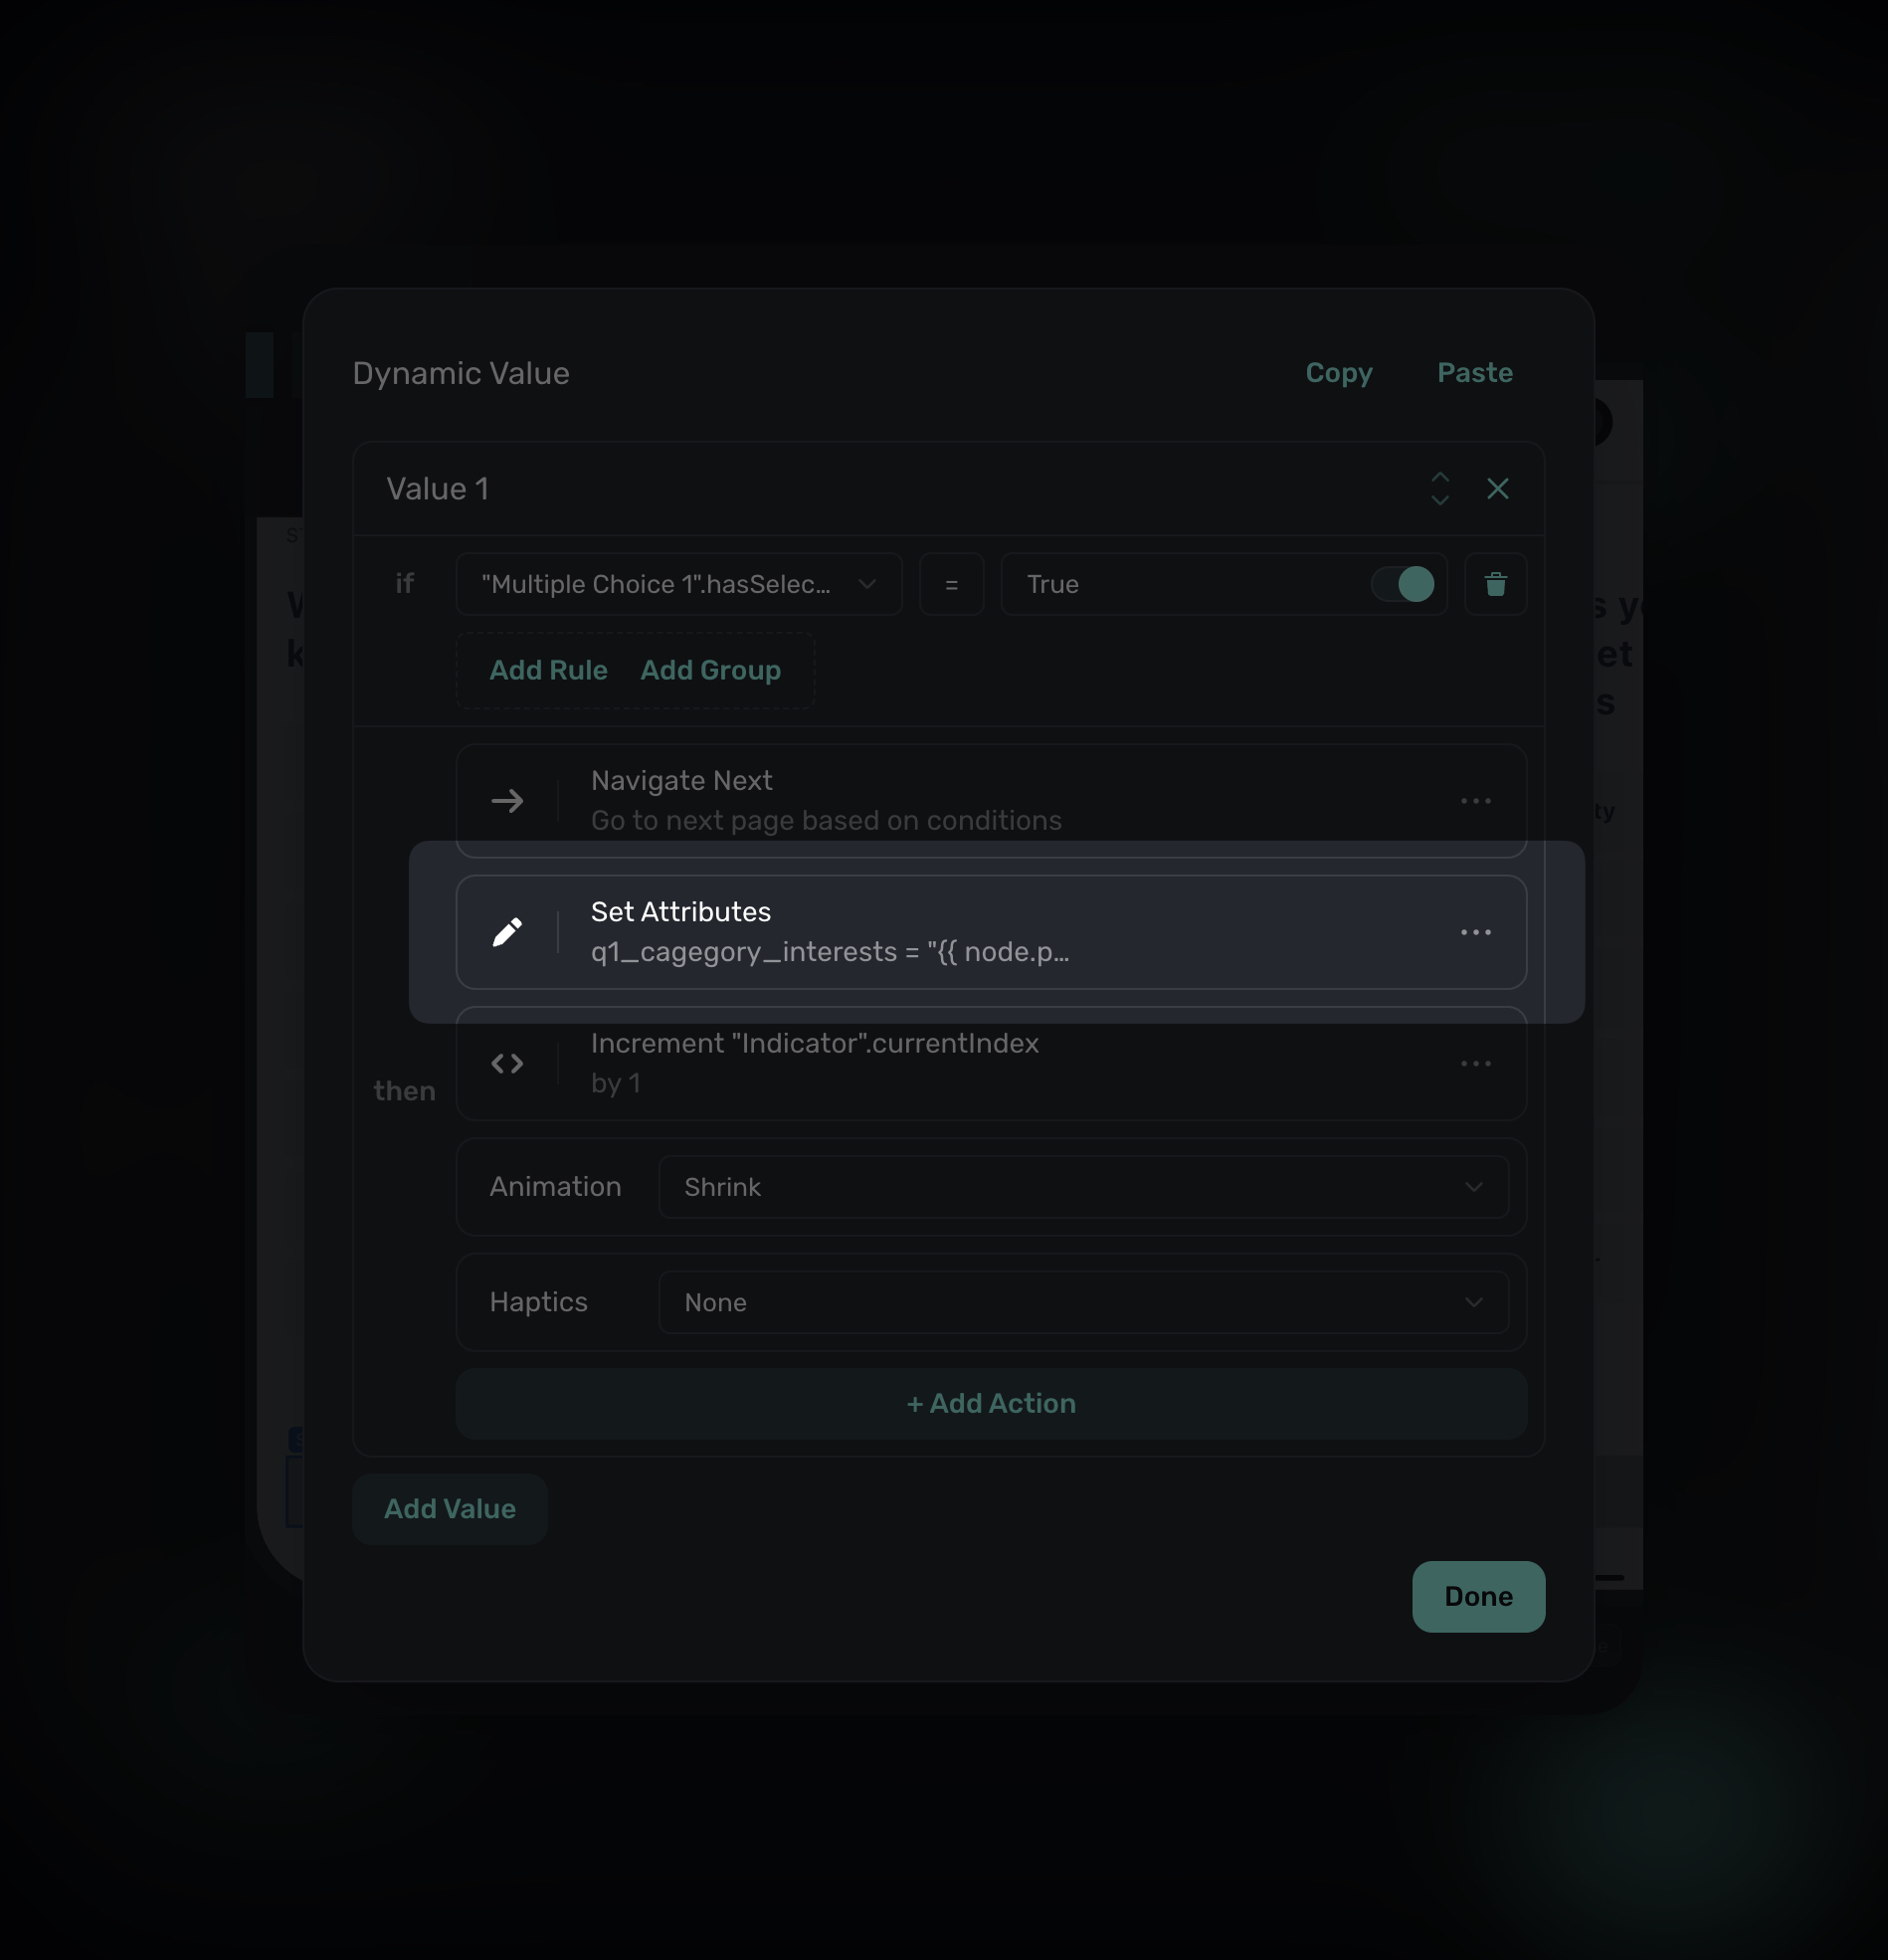
Inside the editor, add a Set Attribute tap behavior to a button or other tappable element. You can store a static value, such as has_completed_onboarding = true, or store a value collected from a Flow Element, such as the selected multiple-choice value.
If your app needs to react when attributes change, use the SDK delegate or event callbacks for your platform. For SDK setup, see Setting User Properties.
Request permissions in context
Flows can request system permissions from a tap behavior. This is useful during onboarding because you can explain the value before showing the native prompt.
Examples:
- Ask for notification permission after explaining what reminders the user will receive.
- Ask for location permission after showing the location-based feature.
- Ask for camera or photo access after the user chooses a feature that needs it.
- Ask for App Tracking Transparency after explaining how attribution helps personalize offers.
Use Permission Prompts to configure the request, then add If Granted and If Denied follow-up actions. The denied path can route to a short explanation page or continue onboarding without that capability.
Add the paywall at the right moment
You can place a paywall anywhere in the onboarding Flow. Common patterns include:
| Pattern | When to use it |
|---|---|
| Early paywall | The product value is already clear and conversion is the primary goal. |
| Mid-flow paywall | The user has answered enough questions to personalize the offer. |
| End-of-onboarding paywall | The user has seen the core value and is ready to start. |
| Post-purchase continuation | The user buys, then continues through setup or a welcome page. |
By default, a purchase closes the paywall or Flow. If onboarding should continue after purchase, set the purchase action's After Purchase behavior to Navigate Page. See After purchase behavior for setup.
Measure onboarding performance
Use Flow Journey analytics to understand how users move through onboarding after the Flow is live.

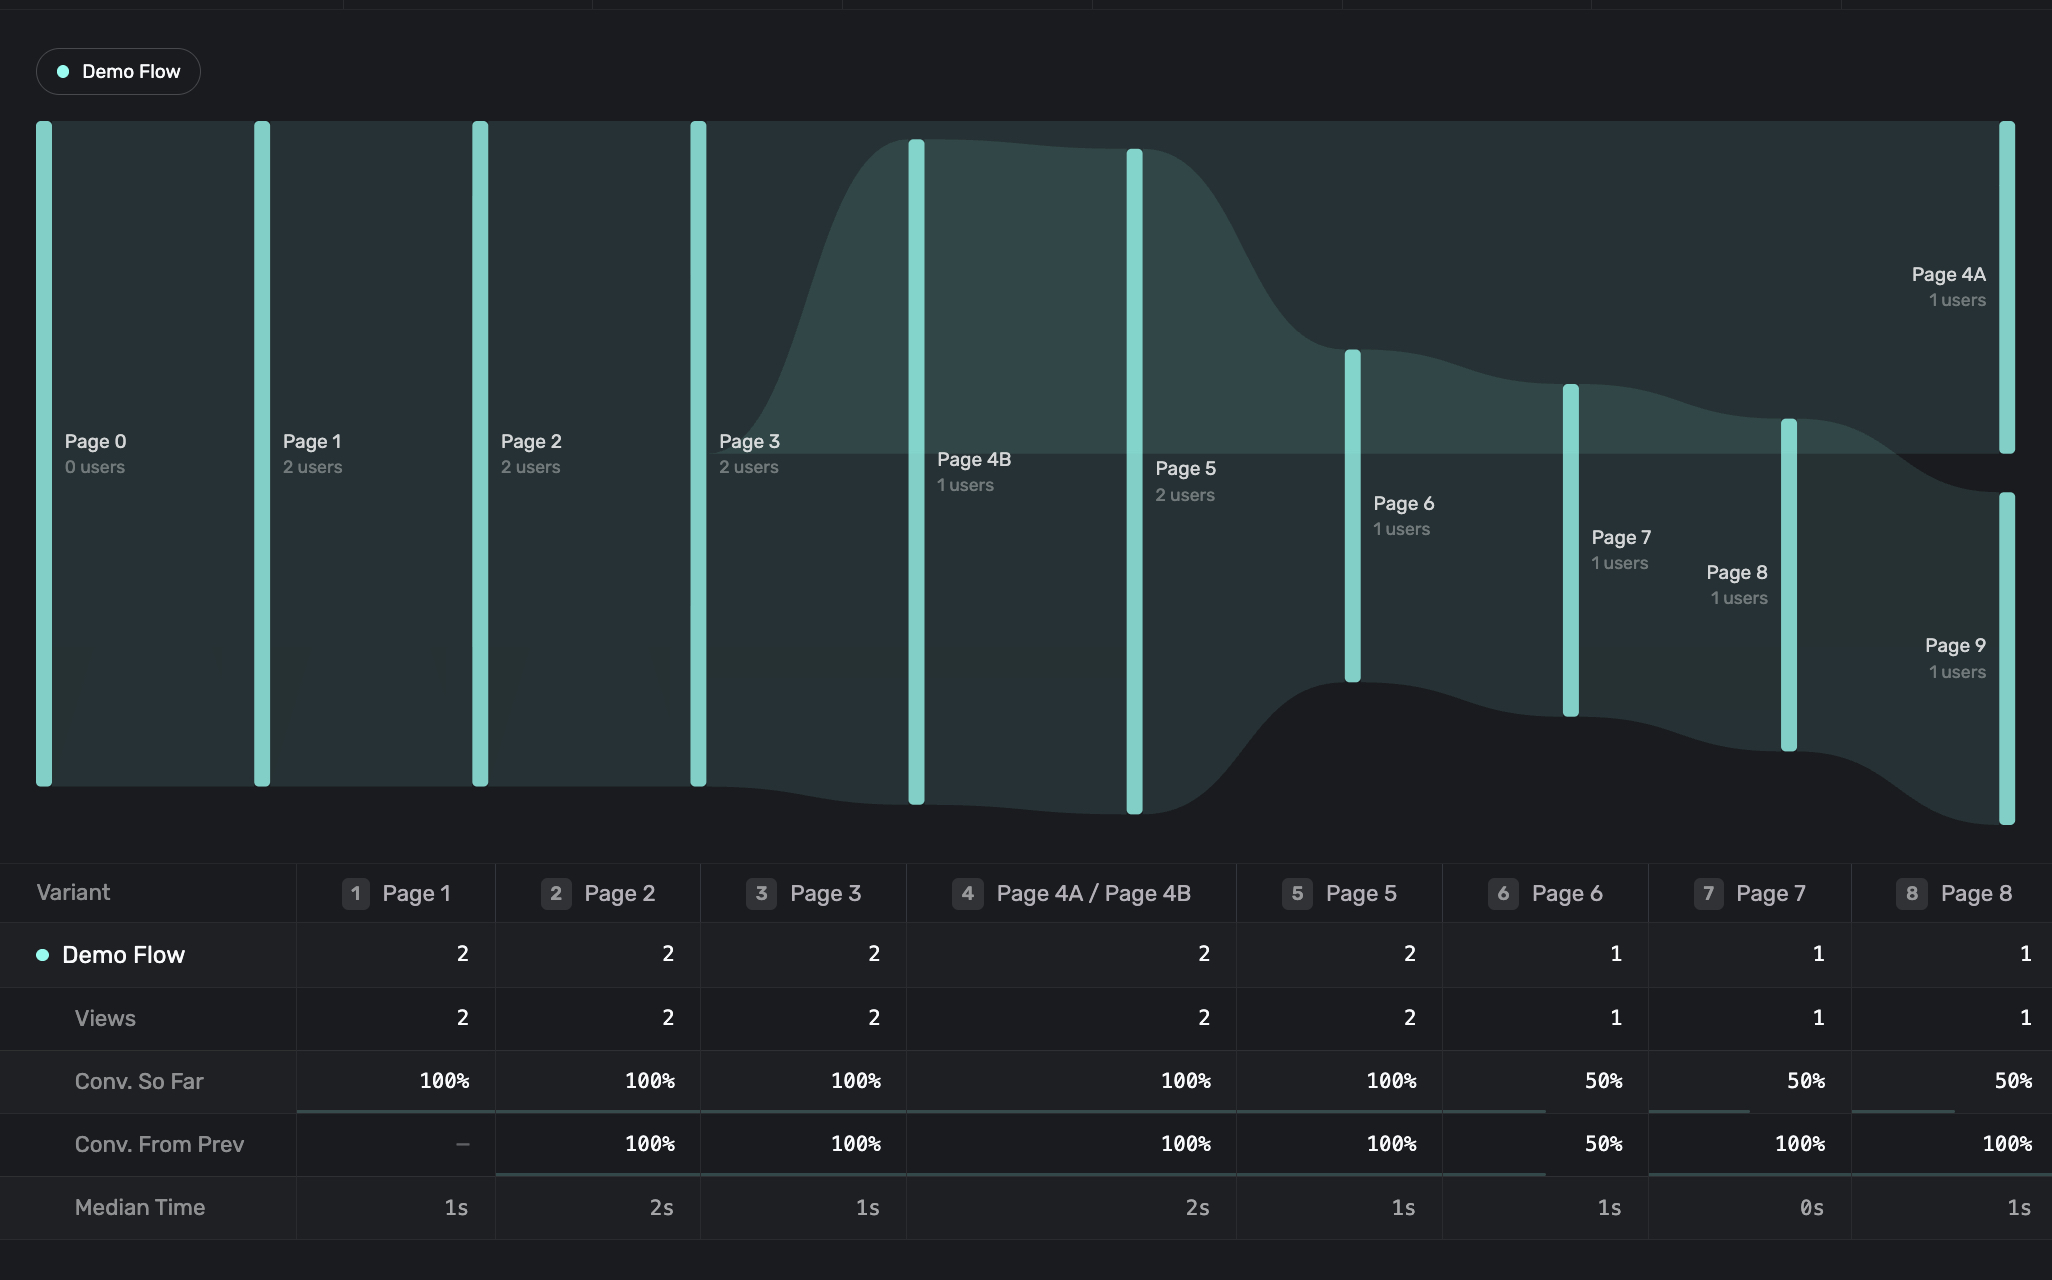
Use Flow Journey to answer:
- Which onboarding step has the largest drop-off?
- Which branch produces the highest trial or purchase conversion?
- Are users reaching the paywall?
- Are users spending too long on a question or permission page?
- Do different variants produce different journey shapes?
For campaign-level testing, create variants of the Flow paywall or test different campaign audiences. Compare both conversion and step-by-step drop-off; the highest-converting onboarding path is not always the shortest one.
Best practices
- Keep onboarding focused on one job: activation, preference collection, education, permission setup, or monetization.
- Build the first version linearly, then add branching once the core path works.
- Use indicators when the Flow has more than 3-4 steps.
- Ask only for information you will use in the Flow, app, or future targeting.
- Request permissions after explaining why they matter.
- Keep branch conditions simple enough that the Canvas and analytics remain easy to read.
- Name pages clearly so Flow Journey labels are useful later.
- Use a final page or attribute to mark onboarding completion.
Related docs
How is this guide?